
Hola, les saluda Luis y hoy les traigo este nuevo artículo.
Índice
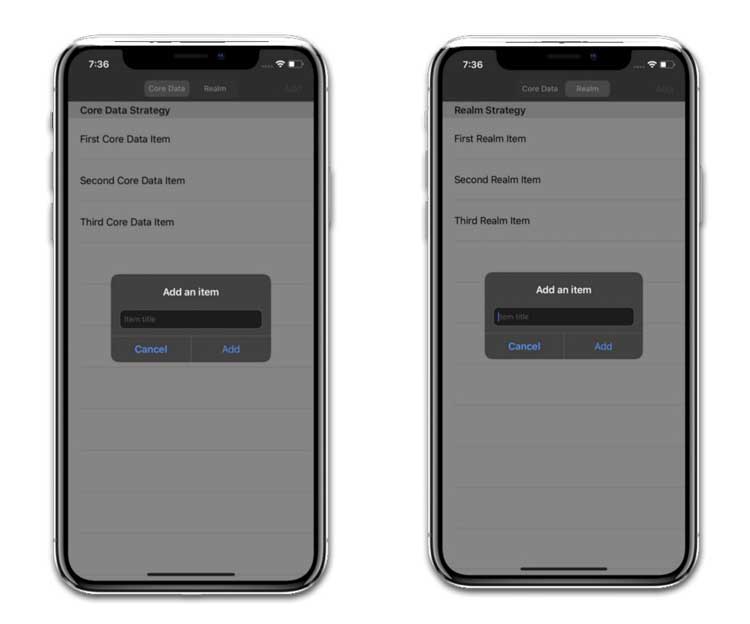
Cambie entre Realm y Core Data usando solo una línea de código
Strategy.Strategy proporciona funcionalidad para cambiar entre objetos intercambiables durante el tiempo de ejecución.
Esto es muy útil cuando queremos implementar tanto Core Data como Realm, lo que nos da la capacidad de cambiar fácilmente entre ellas en nuestra aplicación iOS.
Empecemos
Eche un vistazo a la estructura de nuestro proyecto:
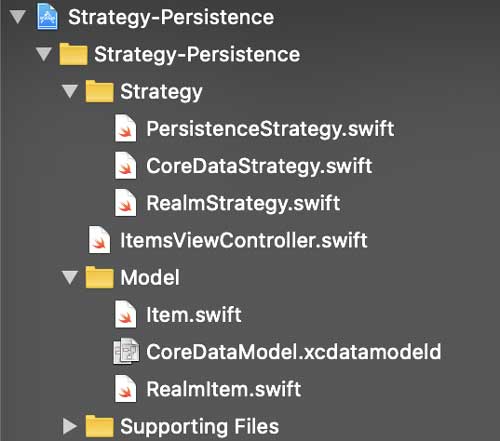
La carpeta Strategy tiene el protocolo PersistenceStrategy que CoreDataStrategy y RealmStrategy se ajustará.
Dentro de la carpeta Model tenemos un plano Item que usamos dentro del ItemsViewController para representar elementos persistentes:
import Foundation

class Item {

    var title: String
    var id: String

    init(title: String, id: String) {
        self.title = title
        self.id = id
    }
}
Echemos un vistazo al CoreDataModel.xcdatamodeld ahora:
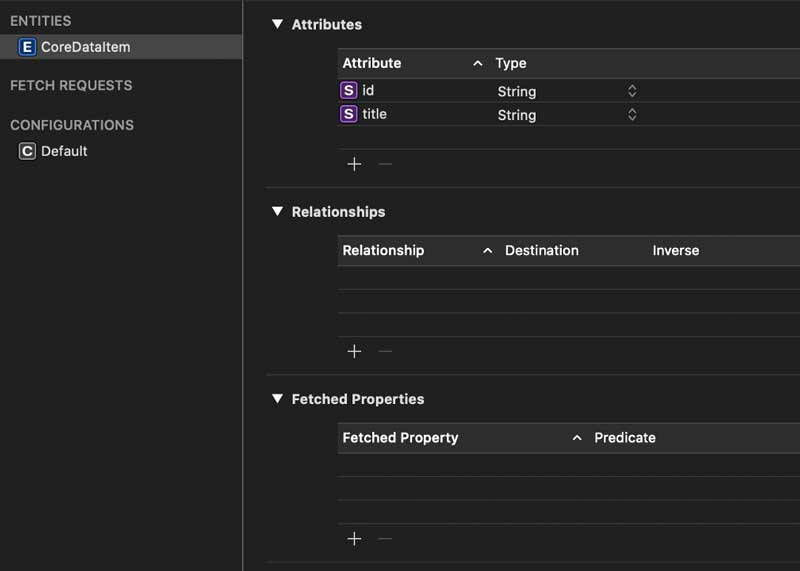
Podemos ver que tenemos una CoreDataItem entidad que tiene las siguientes propiedades (atributos): id y title, ambos tipos de String.
Al realizar operaciones CRUD con él, transformaremos este objeto CoreDataItem en el plano del controlador Item.
RealmItem describe Realm el objeto persistente que también transformaremos en Item:
import RealmSwift

class RealmItem: Object {

    @objc dynamic var title: String = ""
    @objc dynamic var id: String = ""

    convenience init(title: String, id: String) {
        self.init()
        self.title = title
        self.id = id
    }
}
¡Excelente! Hemos cubierto los Model aspectos de nuestra aplicación MVC, ahora podemos saltar directamente a la creación de nuestra implementación Strategy.
Definir la estrategia de persistencia
En nuestra aplicación, queremos recuperar, agregar, editar y eliminar elementos. Por lo tanto, tenemos el siguiente conjunto de reglas en nuestro protocolo:
import Foundation

protocol PersistenceStrategy: class {
    var title: String { get }

    func addItem(title: String) -> Item?
    func getItems() -> [Item]
    func editItem(id: String, newTitle: String, success: @escaping () -> ())
    func deleteItem(id: String, success: @escaping () -> ())
}
Definimos la title propiedad para establecer un encabezado para a UITableView en el futuro.
Ahora, agreguemos implementaciones de Core Data y Realm de este protocolo.
Estrategia de persistencia de datos centrales
Necesitamos crear una clase CoreDataStrategy y cumplir con el PersistenceStrategy.
import UIKit
import CoreData

class CoreDataStrategy: PersistenceStrategy {
    var title: String = "Core Data Strategy"

    // MARK: - Create
    func addItem(title: String) -> Item? {
        guard let appDelegate = UIApplication.shared.delegate as? AppDelegate else {
            return nil
        }
        let managedContext = appDelegate.persistentContainer.viewContext

        let itemEntity = NSEntityDescription.insertNewObject(forEntityName: "CoreDataItem", into: managedContext) as! CoreDataItem
        itemEntity.title = title
        itemEntity.id = UUID().uuidString
        do {
            try managedContext.save()
        } catch {
            print(error)
            return nil
        }
        return Item(title: itemEntity.title!,
                    id: itemEntity.id!)
    }
    // MARK: - Read
    func getItems() -> [Item] {
        guard let appDelegate = UIApplication.shared.delegate as? AppDelegate else {
            return []
        }
        let managedContext = appDelegate.persistentContainer.viewContext

        let fetchRequest = NSFetchRequest<NSFetchRequestResult>(entityName: "CoreDataItem")

        do {
            let result = try managedContext.fetch(fetchRequest)

            if let coreDataItems = result as? [CoreDataItem] {
                let items = coreDataItems
                    .map { Item(
                        title: $0.title!,
                        id: $0.id!)
                    }
                return items
            } else {
                return []
            }
        } catch {
            print("Couldn't get items from Core Data")
            return []
        }
    }
    // MARK: - Update
    func editItem(id: String, newTitle: String, success: @escaping () -> ()) {

        guard let appDelegate = UIApplication.shared.delegate as? AppDelegate else {
            return
        }
        let managedContext = appDelegate.persistentContainer.viewContext

        let fetchRequest = NSFetchRequest<NSFetchRequestResult>(entityName: "CoreDataItem")
        fetchRequest.predicate = NSPredicate(format: "id = %@", id)

        do {
            let result = try managedContext.fetch(fetchRequest)

            let objectToUpdate = result[0] as! NSManagedObject
            objectToUpdate.setValue(newTitle, forKey: "title")

            do {
                try managedContext.save()
                success()
            } catch {
                print(error)
            }
        } catch {
            print(error)
            return
        }
    }
    // MARK: - Delete
    func deleteItem(id: String, success: @escaping () -> ()) {
        guard let appDelegate = UIApplication.shared.delegate as? AppDelegate else {
            return
        }
        let managedContext = appDelegate.persistentContainer.viewContext

        let fetchRequest = NSFetchRequest<NSFetchRequestResult>(entityName: "CoreDataItem")
        fetchRequest.predicate = NSPredicate(format: "id = %@", id)
        do {
            let result = try managedContext.fetch(fetchRequest)

            if let objectToDelete = result.first as? NSManagedObject {
                managedContext.delete(objectToDelete)
                do {
                    try managedContext.save()
                    success()
                } catch {
                    print(error)
                }
            }
        } catch {
            print(error)
        }
    }
}
Hemos implementado todos los métodos necesarios con Core Data.
Estrategia de persistencia del reino
Ahora vamos a definir la implementación del protocolo PersistenceStrategy específica de Realm:
import RealmSwift

class RealmStrategy: PersistenceStrategy {

    var title: String = "Realm Strategy"

    // MARK: - Create
    func addItem(title: String) -> Item? {

        let realm = try! Realm()
        let realmItem = RealmItem(title: title, id: UUID().uuidString)
        do {
            try realm.write {
                realm.add(realmItem)
            }
            return Item(title: realmItem.title,
                        id: realmItem.id)
        } catch {
            print(error)
            return nil
        }
    }
    // MARK: - Read
    func getItems() -> [Item] {

        let realm = try! Realm()
        let realmItems = realm.objects(RealmItem.self)

        let items: [Item] = realmItems.compactMap { Item(title: $0.title, id: $0.id)
        }
        return items
    }
    // MARK: - Update
    func editItem(id: String, newTitle: String, success: @escaping () -> ()) {

        let realm = try! Realm()
        let realmItem = realm.objects(RealmItem.self)
            .filter { $0.id == id }
            .first
        do {
            if realmItem != nil {
                try realm.write {
                    realmItem!.title = newTitle
                    success()
                }
            }
        } catch {
            print(error)
        }
    }
    // MARK: - Delete
    func deleteItem(id: String, success: @escaping () -> ()) {

        let realm = try! Realm()
        let itemToDelete = realm.objects(RealmItem.self)
            .filter { $0.id == id }
            .first
        do {
            if let object = itemToDelete {
                try realm.write {
                    realm.delete(object)
                    success()
                }
            }
        } catch {
            print(error)
        }
    }
}
Como podemos ver, el patrón Strategy de diseño nos permite ocultar la implementación real de la base de datos detrás de escena.
Ahora ItemsViewController no sabrá qué base de datos en particular estamos usando en nuestra aplicación. Simplemente llamará a los métodos del protocolo PersistenceStrategy.
import UIKit

class ItemsViewController: UIViewController {

    // MARK: - Lifecycle Methods
    override func viewDidLoad() {
        super.viewDidLoad()
        setupUI()

        items = persistenceStrategy.getItems()
    }
    override func viewWillAppear(_ animated: Bool) {
        super.viewWillAppear(animated)
        setupNavItem()
    }
    // MARK: - Actions
    @objc func persistenceTypeChanged(sender: UISegmentedControl) {

        switch sender.selectedSegmentIndex  {
        case 0:
            persistenceStrategy = CoreDataStrategy()
            items = persistenceStrategy.getItems()
            tableView.reloadData()
        case 1:
            persistenceStrategy = RealmStrategy()
            items = persistenceStrategy.getItems()
            tableView.reloadData()
        default: break
        }
    }
    @objc func addButtonTapped() {
        let alert = UIAlertController(title: "Add an item", message: nil, preferredStyle: .alert)

        let add = UIAlertAction(title: "Add", style: .default) { _ in
            if let title = alert.textFields![0].text {

                if let newItem = self.persistenceStrategy.addItem(title: title) {
                self.items.append(newItem)
                self.tableView.reloadData()
                }
            }
        }
        let cancel = UIAlertAction(title: "Cancel", style: .cancel, handler: nil)

        alert.addTextField { (textField) in
            textField.placeholder = "Item title"
        }
        alert.addAction(add)
        alert.addAction(cancel)

        self.present(alert, animated: true, completion: nil)
    }
    func presentAlert(with title: String,
                      and id: String) {
        let alert = UIAlertController(title: "Edit an item", message: nil, preferredStyle: .alert)

        let edit = UIAlertAction(title: "Edit", style: .default) { _ in
            if let newTitle = alert.textFields![0].text {

                self.persistenceStrategy.editItem(id: id, newTitle: newTitle) {
                    let itemToEdit = self.items
                        .filter { $0.id == id }
                        .first!

                    itemToEdit.title = newTitle
                    self.tableView.reloadData()
                }
            }
        }
        let cancel = UIAlertAction(title: "Cancel", style: .cancel, handler: nil)

        alert.addTextField { (textField) in
            textField.placeholder = "Item new title"
            textField.text = title
        }
        alert.addAction(edit)
        alert.addAction(cancel)

        self.present(alert, animated: true, completion: nil)
    }
    // MARK: - Properties
    var persistenceStrategy: PersistenceStrategy = CoreDataStrategy()
    private var items = [Item]()

    lazy var persistenceTypeSegmentedControl: UISegmentedControl = {
        let control = UISegmentedControl(items: ["Core Data", "Realm"])
        control.selectedSegmentIndex = 0
        control.addTarget(self, action: #selector(persistenceTypeChanged), for: .valueChanged)
        return control
    }()
    lazy var tableView: UITableView = {
        let tableView = UITableView()
        tableView.rowHeight = 70
        tableView.delegate = self
        tableView.dataSource = self
        tableView.register(UITableViewCell.self, forCellReuseIdentifier: "Cell")
        tableView
            .translatesAutoresizingMaskIntoConstraints = false
        return tableView
    }()
    lazy var addButtonItem: UIBarButtonItem = {
        let item = UIBarButtonItem(title: "Add", style: .plain, target: self, action: #selector(addButtonTapped))
        return item
    }()
}
// MARK: - UITableView Delegate & Data Source
extension ItemsViewController: UITableViewDelegate, UITableViewDataSource {

    func numberOfSections(in tableView: UITableView) -> Int {
        return 1
    }
    func tableView(_ tableView: UITableView, numberOfRowsInSection section: Int) -> Int {
        return items.count
    }
    func tableView(_ tableView: UITableView, titleForHeaderInSection section: Int) -> String? {
        return persistenceStrategy.title
    }
    func tableView(_ tableView: UITableView, cellForRowAt indexPath: IndexPath) -> UITableViewCell {

        let cell = tableView.dequeueReusableCell(withIdentifier: "Cell", for: indexPath)
        cell.textLabel?.text = items[indexPath.row].title
        return cell
    }
    func tableView(_ tableView: UITableView, didSelectRowAt indexPath: IndexPath) {

        let itemToEdit = items[indexPath.row]
        self.presentAlert(with: itemToEdit.title, and: itemToEdit.id)
        self.tableView.deselectRow(at: indexPath, animated: true)
    }
    func tableView(_ tableView: UITableView, commit editingStyle: UITableViewCell.EditingStyle, forRowAt indexPath: IndexPath) {

        if editingStyle == .delete {
            persistenceStrategy.deleteItem(id: items[indexPath.row].id) {
                self.items.remove(at: indexPath.row)
                self.tableView.deleteRows(at: [indexPath], with: .automatic)
            }
        }
    }
}
// MARK: - UI Setup
extension ItemsViewController {
    private func setupUI() {
        if #available(iOS 13.0, *) {
            overrideUserInterfaceStyle = .light
        }
        self.view.backgroundColor = .white

        self.view.addSubview(tableView)

        NSLayoutConstraint.activate([
            tableView.widthAnchor
                .constraint(equalTo: self.view.widthAnchor),
            tableView.heightAnchor
                .constraint(equalTo: self.view.heightAnchor)
        ])
    }
    private func setupNavItem() {
        self.navigationItem.title = "Items"
        self.navigationItem.rightBarButtonItem = addButtonItem
        self.navigationItem.titleView = persistenceTypeSegmentedControl
    }
}
Como puede ver, tenemos la propiedad persistenceStrategy de clase no específica PersistenceStrategy y una items propiedad que contiene una matriz de objetos Item:
class ItemsViewController: UIViewController {
...
// MARK: - Properties
var persistenceStrategy: PersistenceStrategy = CoreDataStrategy()
private var items = [Item]()
....
}
Ahora echemos un vistazo a cómo llamamos a los métodos PersistenceStrategy de protocolo.
Agregamos un elemento a una base de datos después de que el usuario toca UIBarButtonItem, escribe algo en a UITextField y presiona «Agregar»:
@objc func addButtonTapped() {
    let alert = UIAlertController(title: "Add an item", message: nil, preferredStyle: .alert)

    let add = UIAlertAction(title: "Add", style: .default) { _ in
        if let title = alert.textFields![0].text {

            if let newItem = self.persistenceStrategy.addItem(title: title) {
            self.items.append(newItem)
            self.tableView.reloadData()
            }
        }
    }
    let cancel = UIAlertAction(title: "Cancel", style: .cancel, handler: nil)

    alert.addTextField { (textField) in
        textField.placeholder = "Item title"
    }
    alert.addAction(add)
    alert.addAction(cancel)

    self.present(alert, animated: true, completion: nil)
}
Recuperamos todos los elementos del método viewDidLoad y los asignamos a la propiedad items:
// MARK: - Lifecycle Methods
override func viewDidLoad() {
    super.viewDidLoad()
    setupUI()

    items = persistenceStrategy.getItems()
}
Para editar un elemento, seleccionamos una fila particular del tableView y escribimos un nuevo título en UITextField:
func presentAlert(with title: String,
                  and id: String) {
    let alert = UIAlertController(title: "Edit an item", message: nil, preferredStyle: .alert)

    let edit = UIAlertAction(title: "Edit", style: .default) { _ in
        if let newTitle = alert.textFields![0].text {

            self.persistenceStrategy.editItem(id: id, newTitle: newTitle) {
                let itemToEdit = self.items
                    .filter { $0.id == id }
                    .first!

                itemToEdit.title = newTitle
                self.tableView.reloadData()
            }
        }
    }
    let cancel = UIAlertAction(title: "Cancel", style: .cancel, handler: nil)

    alert.addTextField { (textField) in
        textField.placeholder = "Item new title"
        textField.text = title
    }
    alert.addAction(edit)
    alert.addAction(cancel)

    self.present(alert, animated: true, completion: nil)
}
Para eliminar un elemento, tenemos que agregar la implementación al método tableView(_:commit:forRowAt:):
func tableView(_ tableView: UITableView, commit editingStyle: UITableViewCell.EditingStyle, forRowAt indexPath: IndexPath) {

    if editingStyle == .delete {
        persistenceStrategy.deleteItem(id: items[indexPath.row].id) {
            self.items.remove(at: indexPath.row)
            self.tableView.deleteRows(at: [indexPath], with: .automatic)
        }
    }
}
Ahora, la parte más interesante: ¿Cómo cambiamos entre Realm y Core Data? Para eso tenemos un UISegmentedControl en el UINavigationBar, en cuya selección activamos este código:
@objc func persistenceTypeChanged(sender: UISegmentedControl) {

    switch sender.selectedSegmentIndex  {
    case 0:
        persistenceStrategy = CoreDataStrategy()
        items = persistenceStrategy.getItems()
        tableView.reloadData()
    case 1:
        persistenceStrategy = RealmStrategy()
        items = persistenceStrategy.getItems()
        tableView.reloadData()
    default: break
    }
}
Como puede ver, todo lo que tenemos que hacer para cambiar entre bases de datos es asignar un correspondiente Strategy a la propiedad persistenceStrategy. ¡Ordenado!
ItemsViewController es nuestra .
Por ejemplo, si queremos agregar una implementación de SQLite más adelante, solo necesitamos crear una clase que se ajuste al protocolo PersistenceStrategy, proporcionando una implementación específica de SQLite dentro de los métodos requeridos; ItemsViewController solo será necesario incluir esta clase dentro del método persistenceTypeChanged.
También podemos ver que la arquitectura MVC se ve y se siente mucho mejor cuando se usa junto con otros patrones de diseño.
Muchas gracias por leer este artículo.


Añadir comentario